
Email Provider Setup Guide
Ensure reliable, high-deliverability inbox placement for all post-purchase order confirmations, replenishment reminders, win-back campaigns, birthday celebrations, and loyalty reward sequences by configuring verified mail gateways and domain authentication.
Overview of Email Delivery Architecture
Cartwheel uses an event-driven automation engine to trigger and dispatch post-purchase emails. When a customer completes a checkout or reaches a lifecycle milestone, Cartwheel's background scheduler enrolls the shopper, evaluates audience criteria, and queues personalized emails through your authenticated delivery gateway.
Part 1: Configuring Your Email Gateway
Configure your sending provider at Cartwheel Admin → Settings → Email provider.
Method A: Resend API (Recommended)
Resend is the recommended delivery partner for Cartwheel, offering sub-second transactional delivery, automated bounce handling, and 99%+ primary inbox placement.
Step 1: Create a Resend API Key
- Log in to your Resend Dashboard.
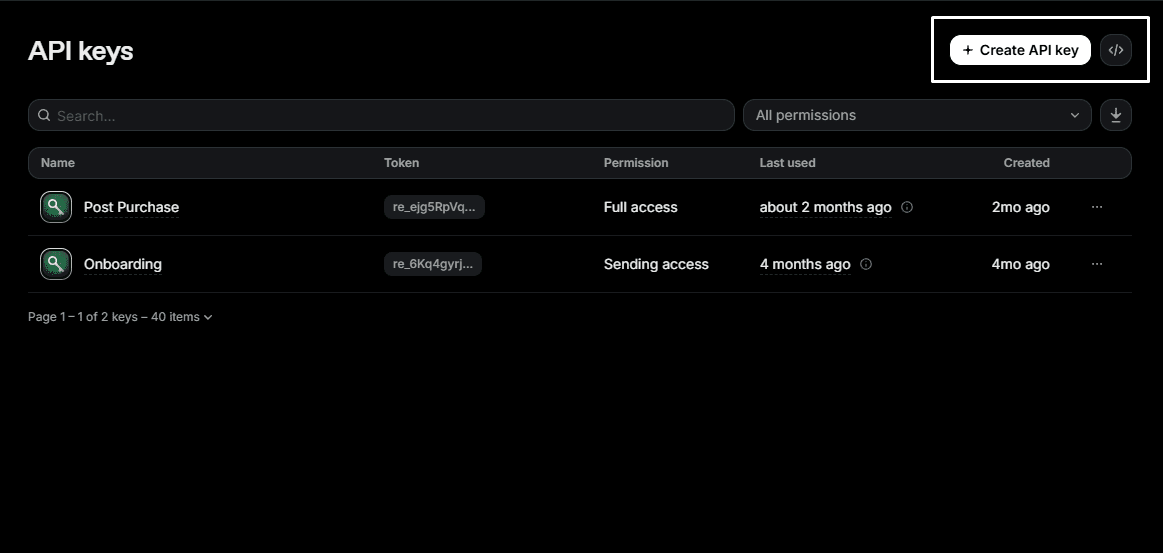
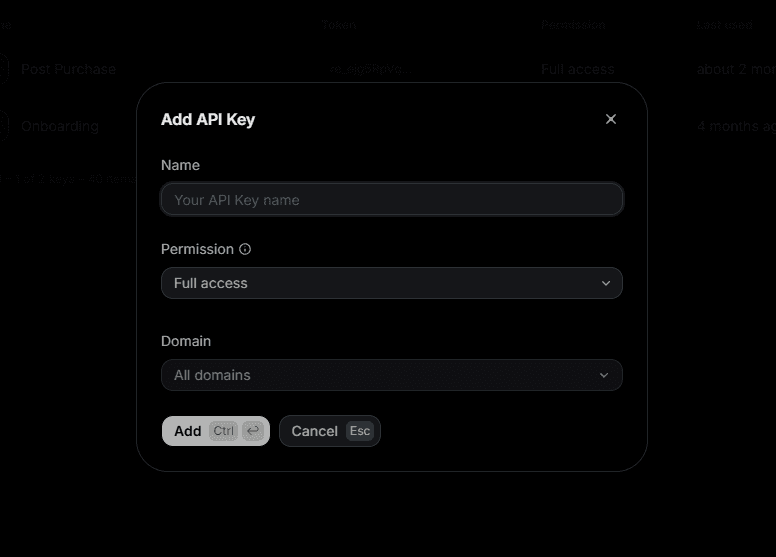
- Click Create API Key, name it
Cartwheel Post-Purchase, select Full Access, and copy the key (starting withre_...).
Step 2: Verify Your Custom Domain in Resend
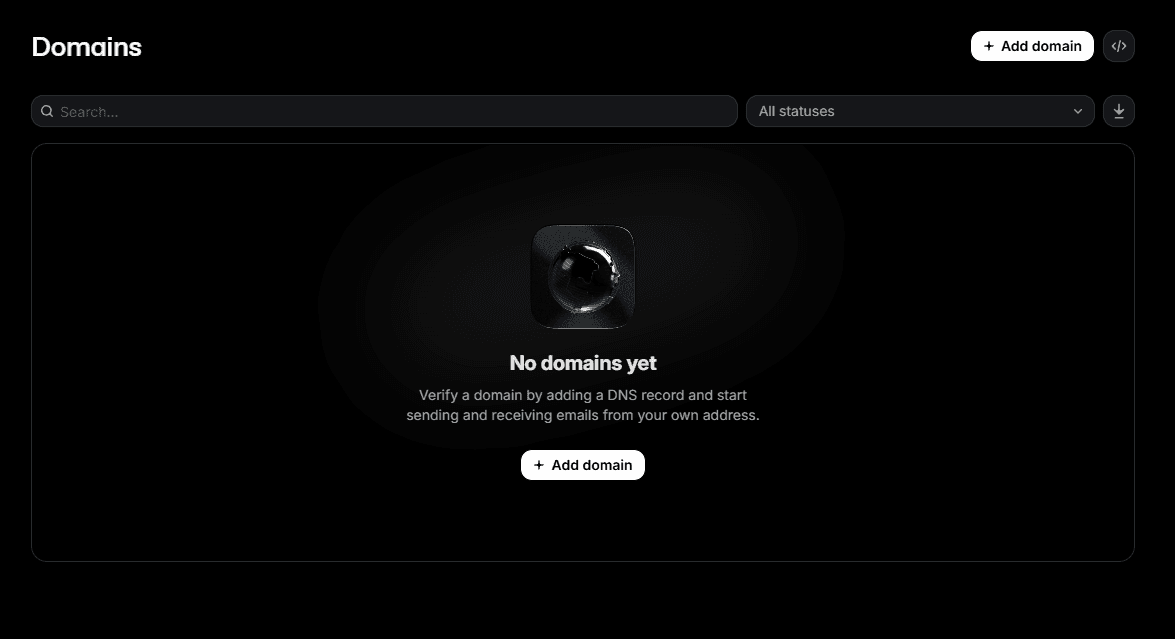
- In Resend, navigate to Domains and click Add Domain.
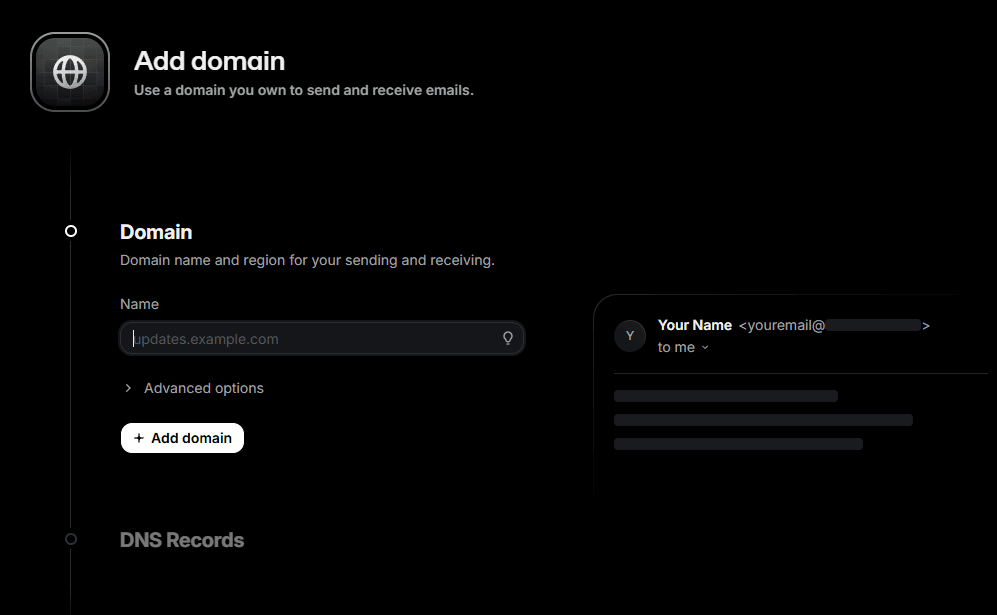
- Enter your store's root domain (e.g.
yourstore.com) or a dedicated mail subdomain (e.g.mail.yourstore.comorsend.yourstore.com).
- Add the DNS records (DKIM and SPF) provided by Resend to your domain registrar (e.g. Cloudflare, GoDaddy, Namecheap, Route 53).
Step 3: Enter Credentials in Cartwheel Settings
- In Cartwheel, navigate to Settings → Email provider.
- Under Select delivery engine, select Resend.
- Fill in your sender details:
- From name: The display name customers see in their inbox (e.g. Acme Store or Acme Care Team).
- From email: Must match your verified domain in Resend (e.g.
[email protected]or[email protected]). - Reply-to email: The address where customer email replies will be delivered (e.g.
[email protected]or your personal inbox). - Resend API key: Paste your
re_...API key.
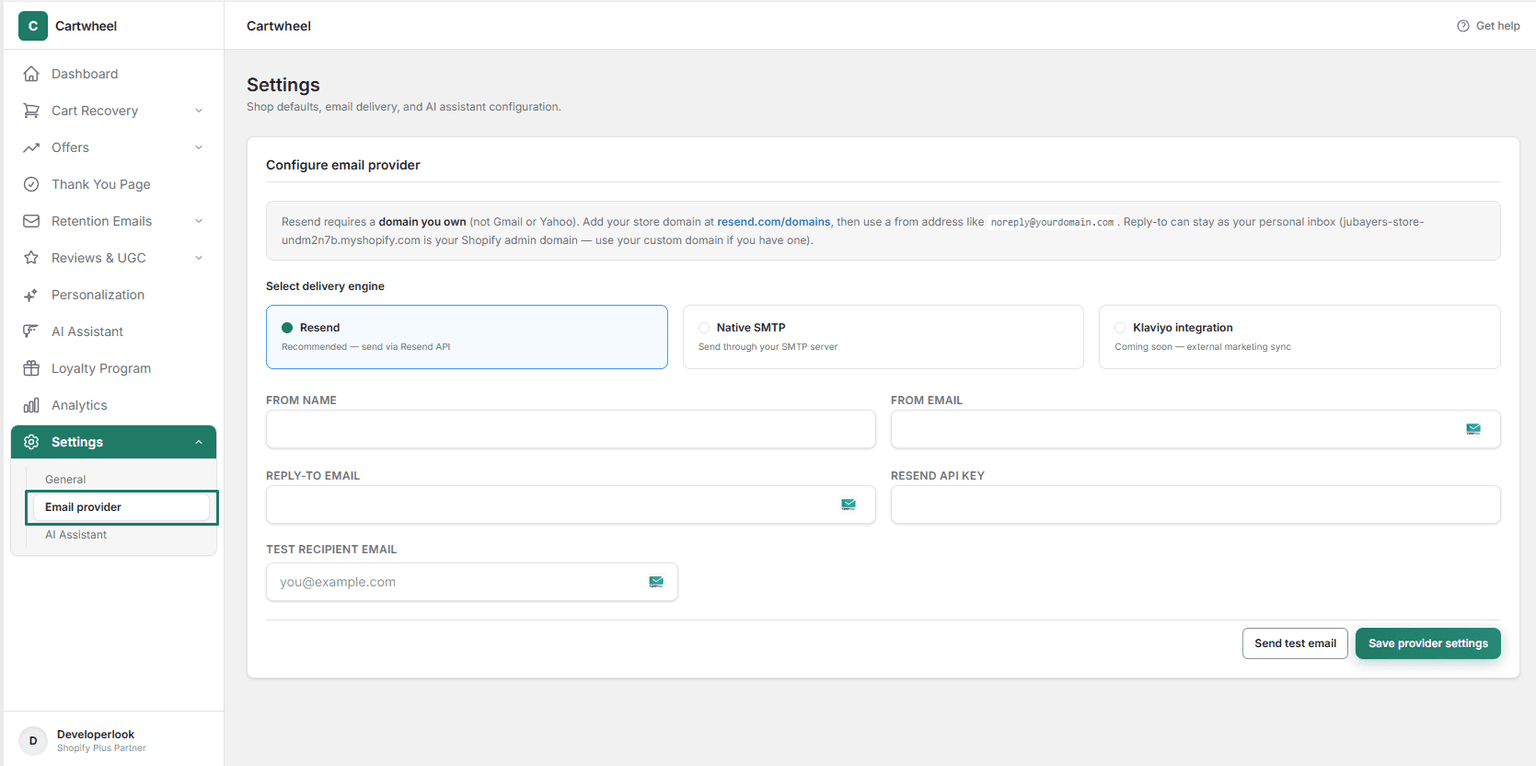
- Enter your email in Test recipient email and click Send test email to verify live transmission.
- Click Save provider settings.
Method B: Native SMTP (Custom Mail Servers)
If your organization uses an existing mail delivery service (e.g. Amazon SES, SendGrid SMTP, Mailgun, Postmark, or a private corporate mail server), you can connect via Native SMTP.
Step-by-Step Configuration:
- In Cartwheel, navigate to Settings → Email provider.
- Under Select delivery engine, select Native SMTP.
- Enter your SMTP connection parameters:
- From name: Brand display name (e.g. Acme Store).
- From email: Authenticated sender email address.
- Reply-to email: Customer response routing address.
- SMTP host: Mail server hostname (e.g.
smtp.sendgrid.net,email-smtp.us-east-1.amazonaws.com, orsmtp.mailgun.org). - SMTP port: Enter
587(standard TLS/STARTTLS) or465(SSL). - SMTP user: Your provider's username or API key username.
- SMTP password: Your provider's SMTP secret or API password.
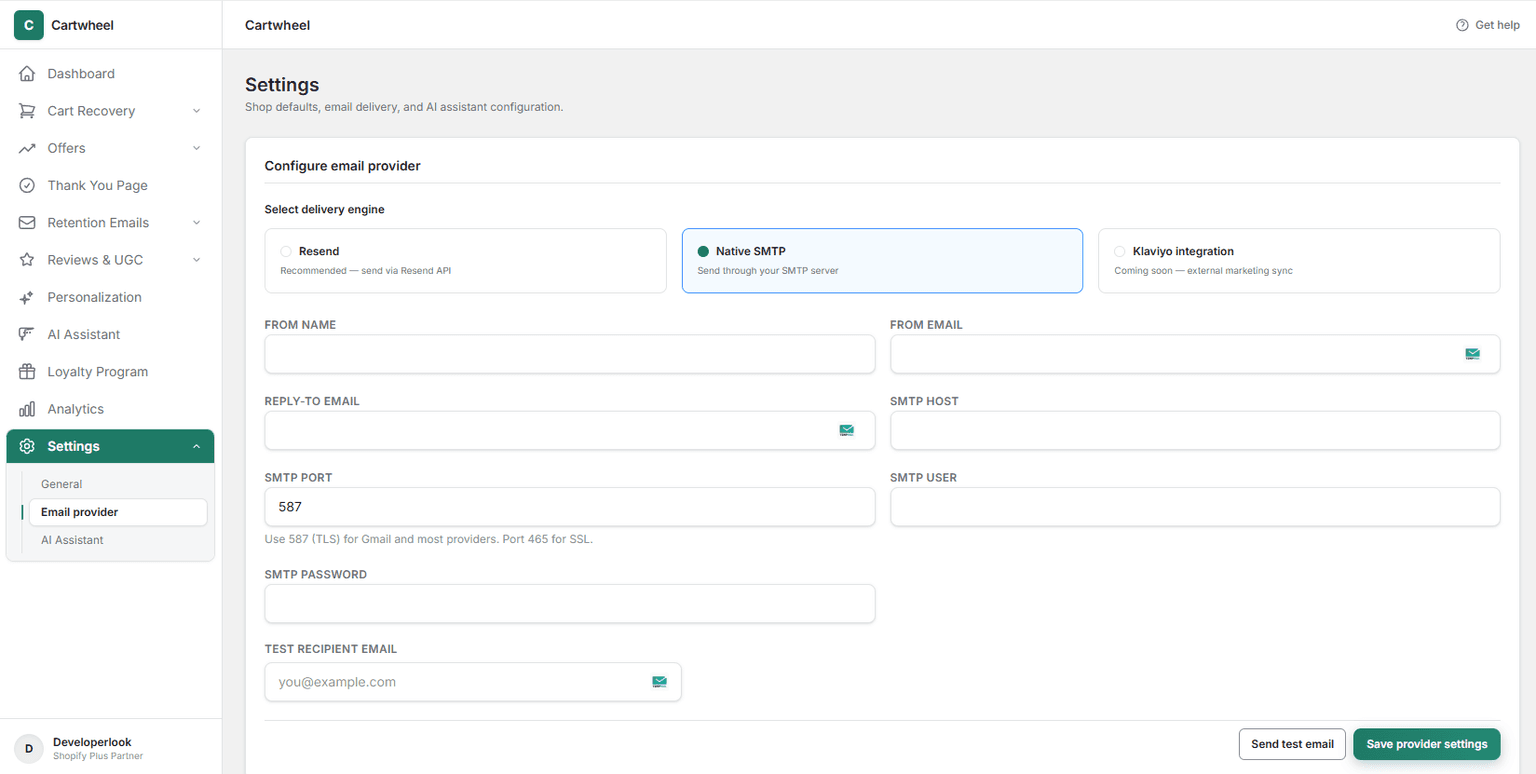
- Enter an address in Test recipient email and click Send test email to validate the handshake.
- Click Save provider settings.
Part 2: Domain Authentication (SPF, DKIM & DMARC)
To comply with major inbox providers (Google, Yahoo, Apple Mail, Microsoft Outlook) and ensure emails bypass spam folders, configure the following DNS records on your domain registrar:
1. Sender Policy Framework (SPF)
Authorize your delivery gateway to send emails on behalf of your domain:
- Type:
TXT - Host / Name:
@(or subdomain likemail) - Value:
v=spf1 include:resend.com ~all(or your SMTP provider's SPF include string)
2. DomainKeys Identified Mail (DKIM)
Cryptographically sign every outgoing message to guarantee authenticity:
- Add the three
CNAMErecords generated in your Resend or SMTP provider dashboard. - Example:
resend._domainkey.yourstore.compointing todkim.resend.com.
3. Domain-based Message Authentication (DMARC)
Instruct receiving mail servers how to treat messages that fail SPF or DKIM:
- Type:
TXT - Host / Name:
_dmarc - Value:
v=DMARC1; p=none; sp=none; rua=mailto:[email protected];
Setup Checklist for New Stores
Follow this quick-start checklist when launching Cartwheel Retention Emails for the first time:
Step 1: Minimize Shopify's Default Order Confirmation (Optional)
Shopify does not allow turning off transactional order confirmations completely, but you can streamline the message so Cartwheel serves as the primary branded experience:
- In your Shopify Admin, navigate to Settings → Notifications → Customer notifications → Order processing → Order confirmation.
- Click Edit code.
- Replace lengthy promotional content with a concise receipt summary (e.g. "Thank you for your order! Your official receipt is on its way from our store.").
- Click Save (you can click Send test to preview Shopify's updated notification).
Step 2: Configure and Verify Email Gateway
- Follow Part 1: Configuring Your Email Gateway to connect your delivery service:
- If using Resend, follow Method A: Resend API to create an API key and verify your sending domain.
- If using a private or third-party SMTP server, follow Method B: Native SMTP.
- Complete domain authentication (SPF, DKIM, DMARC) as described in Part 2: Domain Authentication.
- Send a test email from Cartwheel → Settings → Email provider to confirm delivery.
Step 3: Create an Active Order Confirmation Sequence
- Follow the step-by-step instructions in the Order Confirmation Emails Guide to create and activate your sequence:
- In Retention Emails → Order confirmation, click Create sequence.
- In Sequence settings, configure a
0 minutesdelay for immediate dispatch upon checkout. - In Email steps, select your branded receipt template and link an optional upsell offer.
- Set status to Active and click Save sequence.
Step 4: Activate Lifecycle Sequences
Expand your retention strategy by launching automated customer journeys:
- Replenishment Sequences: Consumable restock reminders based on product usage lifecycles.
- Win-Back Campaigns: Automated comeback offers for inactive customers (30, 60, 90 days).
- Birthday & Anniversary Sequences: Milestone celebrations and gift vouchers.
- Loyalty Program & Tiers: VIP points updates and tier level-up celebrations.
- Abandoned Cart Recovery & Checkout Recovery: Recovering lost sales from abandoned carts and checkout drips.
Troubleshooting & FAQ
Why did my test email fail to send?
- Invalid API Key: Double-check that your Resend API key starts with
re_and has Full Access permissions. - Unverified Sender Domain: In Resend, verify that the domain status is Verified and that your From email matches that exact domain.
- Public Domain Block: Sending from
@gmail.comor@yahoo.comwill be rejected by Resend. - SMTP Port/TLS Mismatch: For port
587, ensure your server supports STARTTLS. For port465, use SSL.
Why are orders not enrolling automatically?
- Open Retention Emails → Order confirmation (or All sequences) and verify that at least one sequence status is set to Active.
- Verify that your customer or test order satisfies the configured Audience Triggers (product/collection filters) and Customer Segments.
- Confirm that the Shopify order payment status is marked as Paid.
How does Cartwheel handle customer unsubscribes?
Every email sent by Cartwheel includes an automated 1-click unsubscribe link. If a customer unsubscribes, Cartwheel immediately flags their profile in the database and cancels all pending sequence steps across all retention workflows.
Related Guides
- Retention Sequences Overview — managing storewide lifecycle campaigns
- Email Template Builder — visual MJML template customization
- Order Confirmation Emails — post-purchase transactional sequences
- Replenishment Emails — consumable restock reminders
- Win-Back Sequences — lapsed customer re-engagement
- Birthday Sequences — celebrating customer milestones
- Loyalty Program & Tiers — points and VIP tier automations
- Abandoned Cart Recovery — recovering abandoned shopping carts
- Abandoned Checkout Recovery — multi-step checkout recovery drips
- Browse Abandonment Recovery — retargeting window shoppers
- Product Reviews & UGC — automated review request emails