
Post-Purchase Conversion Funnels Guide
Conversion Funnels let you chain multiple offers into a prioritized, multi-step upsell sequence—complete with targeting rules, customer segmentation, and optional A/B testing on every step.
Overview: How Conversion Funnels Work
Instead of showing a single standalone offer, a Funnel groups offers into an ordered sequence and controls when and to whom they appear.
Key Components
- Entry Conditions: Cart triggers, audience rules, and optional Shopify customer segments that must be satisfied before the funnel activates.
- Ordered Steps: One or more offers shown in sequence after checkout (or at checkout, depending on the surface type).
- Priority Ranking: When multiple active funnels match a customer's cart, the highest-priority funnel wins.
Creating a Conversion Funnel
To set up and configure a new conversion funnel in Cartwheel:
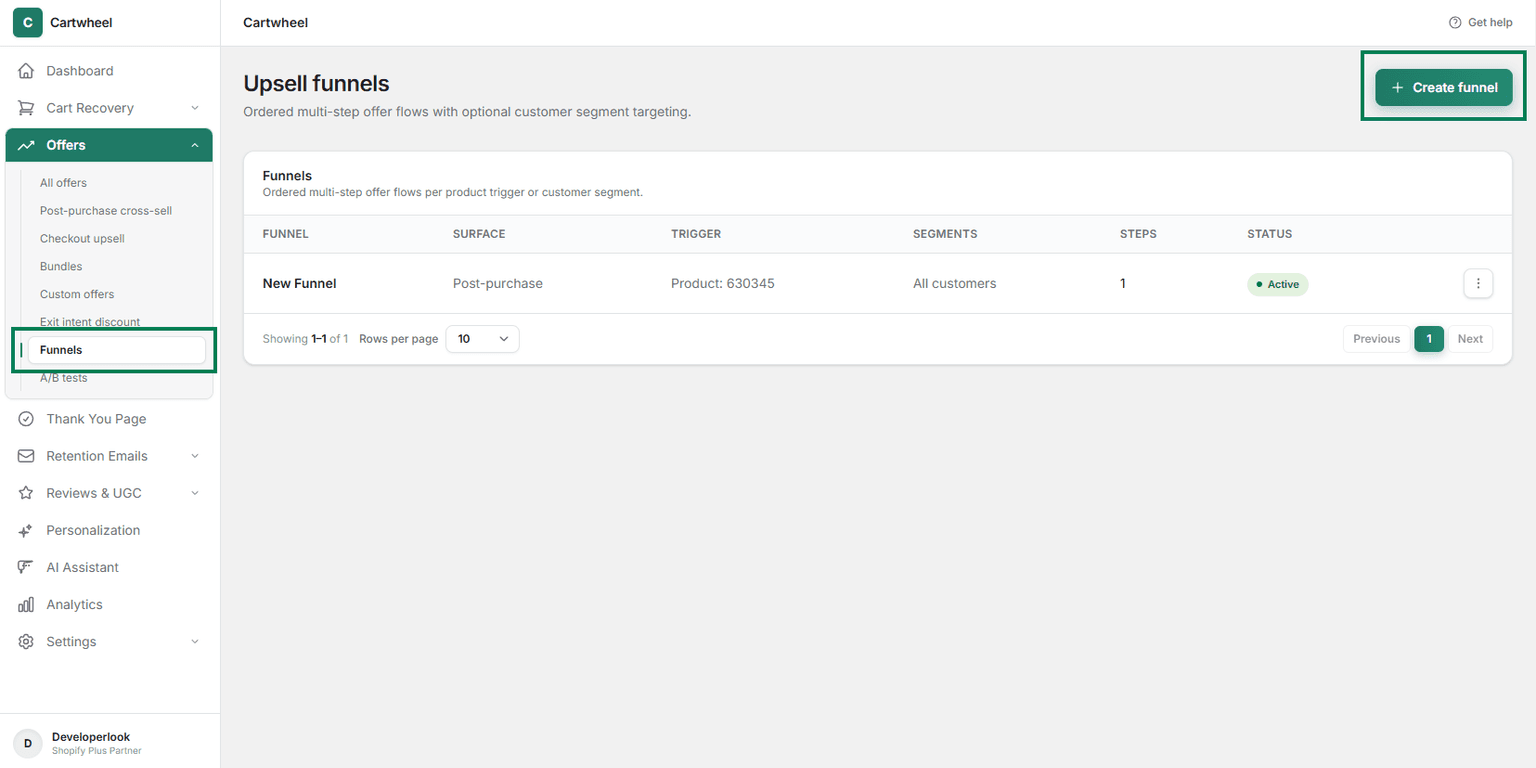
- Navigate to Funnels: Go to Cartwheel Admin → Offers → Funnels.
- Initiate Funnel Creation: Click Create Funnel.
- Configure Core Funnel Details:
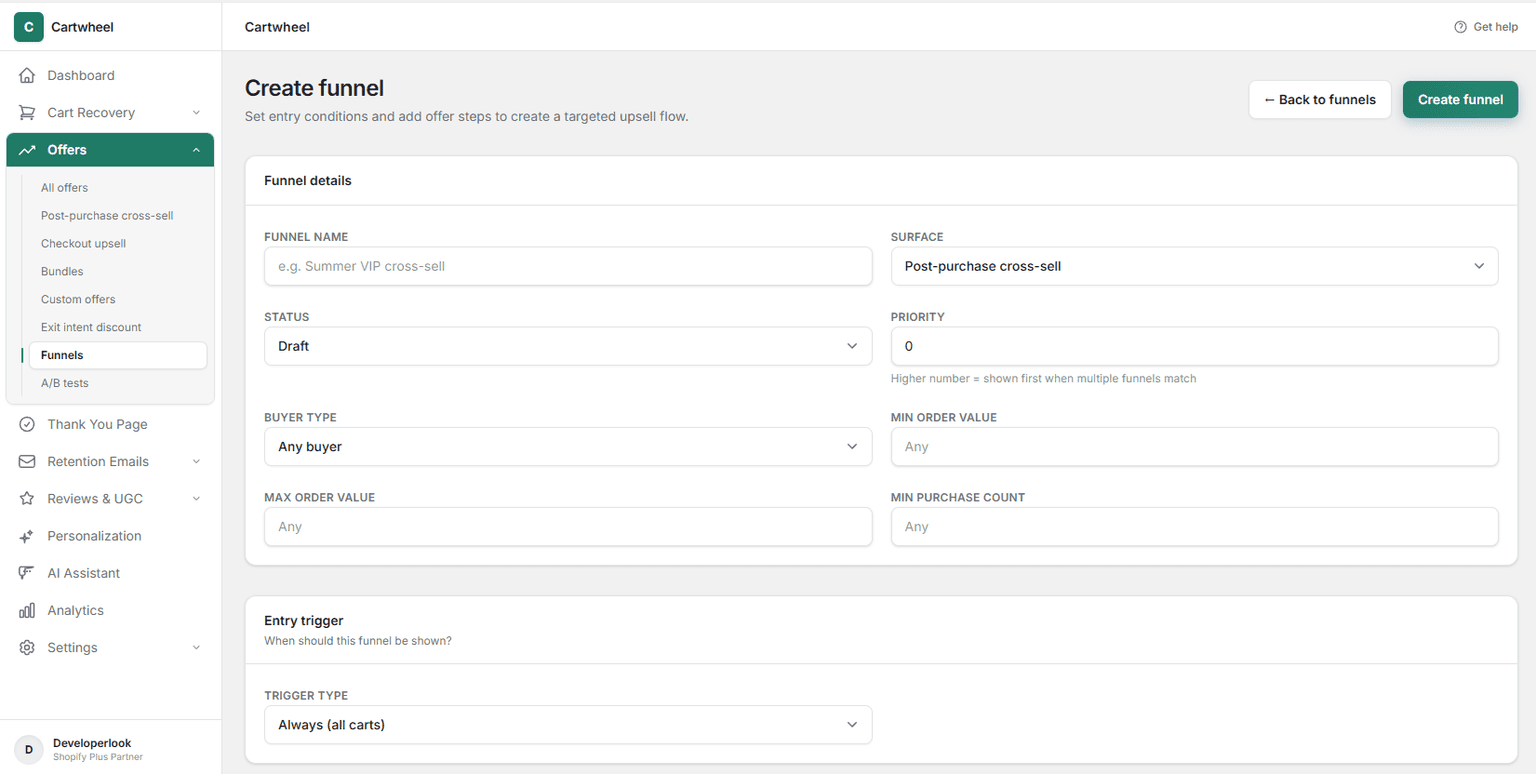
Funnel Name: Enter a descriptive name so you can identify the funnel at a glance (e.g., Summer Apparel VIP Funnel, High-Value Cart Cross-Sell).
Surface: Select where the funnel's offers are displayed to the customer:
Surface Where it appears Post-purchase cross-sell After payment, before the Thank You page (single-click acceptance) Checkout upsell Inside the Shopify Checkout page order summary / shipping section Bundle During checkout in the Checkout Upsell block (adds all bundle products together) Exit intent One-time discount popup on the cart page when a shopper tries to leave Status: Choose between:
Status Behaviour Draft Saved but invisible to customers — use for work-in-progress funnels Active Live and eligible for matching against incoming checkouts Priority: Set a numeric value (0 and up). Higher numbers are evaluated first. When multiple active funnels match a customer's cart, the funnel with the highest priority wins. Ties are broken by creation date (oldest first).
Set Audience Rules (Optional): Restrict the funnel to specific buyer profiles (leave blank to match all customers):
Buyer Type:
Option Who matches Any buyer All customers (default) First-time Customers placing their first-ever order on your store Returning Customers who have placed at least one prior order Buyer type is determined automatically from the customer's order history in your store—no manual tagging required.
Min / Max Order Value: Set a dollar range that the checkout subtotal must fall within (e.g., Min Order Value
$50, Max Order Value$200). Leave either field blank for no upper or lower bound.Min Purchase Count: Require the customer to have at least this many previous orders before the funnel activates (e.g., 3+ prior orders for loyalty-stage funnels).
Define Entry Trigger: Select the cart condition required for the funnel to fire:
Always (All Carts): The funnel runs on every checkout that passes audience rules. No additional cart conditions are checked.
When Cart Contains Products or Collections: The funnel fires only when the cart includes selected products, variants, or items from selected collections:
- Set trigger type to When cart contains products or collections.
- Click Add products to open the Shopify product picker—select one or more products or specific variants.
- Click Add collections to select entire collections—the funnel fires when any item from that collection is in the cart.
When Order Value Exceeds Amount: The funnel fires when the checkout subtotal meets or exceeds a minimum dollar value (e.g.,
$50).
Configure Customer Segments (Optional): Restrict the funnel to customers belonging to specific Shopify customer segments:
- Click segment pills to select/deselect (selected segments appear highlighted).
- The customer must be a member of at least one selected segment for the funnel to match.
- Leave all segments unselected to match all customers (no segment restriction).
Build and Sequence Funnel Steps: Add individual offers to create your multi-step sequence:
- Adding Steps:
- During creation: Select existing unassigned offers as initial steps (assigned as Step 1, Step 2, etc. in selection order).
- After creation: On the funnel edit page, scroll to Funnel Steps and select an unassigned offer from Add step or click Create new offer for this funnel.
- Reordering Steps: Use the ↑ and ↓ arrows on each step card to change the display order seen by customers.
- Editing Step Offers: Click Edit offer on any step card to jump directly to that offer's configuration page.
- Removing Steps: Click Remove on any step card to detach the offer from the funnel (making it available for other funnels).
- Adding Steps:
Configure A/B Testing on Steps (Optional): Split test different offer variants at any step position:
- Click + Run A/B test on any step card to create a new test for that step.
- If a test is active, a blue A/B test active badge appears on the step card—click it to manage the test.
- Uses sticky assignments: once a customer is assigned to a variant, they always see the same variant on repeat visits.
- For detailed configuration, see the A/B Split Testing Guide.
Publish & Save: Review your targeting and steps, toggle status to Active, and click Save.
Funnel Priority & Conflict Resolution
When a customer's cart matches multiple active funnels, Cartwheel resolves conflicts using a strict 4-step precedence rule:
- Highest Priority First: The funnel with the highest numeric priority value wins.
- Audience Preference: Among funnels with equal priority, funnels targeting the customer's specific buyer type (First-time or Returning) are preferred over those set to "Any buyer".
- Creation Date Tiebreaker: If priority and audience specificity are still tied, the oldest funnel is used.
- Single Active Funnel: Only one funnel can run per checkout session. Once a funnel is selected, no other funnels are evaluated.
Funnel Resolution Flow
Here is how Cartwheel resolves which funnel (if any) to show for a given checkout:
Best Practices
- Start with one funnel per surface type: Get familiar with targeting and step ordering before creating multiple competing funnels.
- Use the ALWAYS trigger for your default funnel: Create a catch-all funnel with low priority (e.g.,
0) and "Always" trigger type, so every checkout sees at least one offer. Layer higher-priority, targeted funnels on top. - Keep funnels short: Two to three steps is the sweet spot. More steps can fatigue customers and reduce acceptance rates.
- Combine audience rules with triggers for precision: For example: a "Returning buyer + Footwear collection" funnel showing premium accessory upsells.
- Use A/B tests to optimize: Don't guess which offer converts better at a given step—let data decide.
- Set distinct priorities: Avoid ties by giving each funnel a unique priority number to make conflict resolution predictable.
- Review regularly: Seasonal funnels should be set to Draft when no longer relevant to avoid cluttering the resolution pipeline.
Related Guides
- Post-Purchase Cross-Sells — creating and configuring post-purchase offers
- Checkout Upsells — setting up checkout-page upsell offers
- Product Bundles — building bundle offers
- Exit Intent — setting up exit-intent popups
- A/B Split Testing — running A/B tests on funnel steps
- Customer Personalization — advanced audience targeting