
Review Settings & Social Sync Guide
Configure review delivery schedules, automate photo/video incentives (discounts or loyalty points), and connect Facebook & Instagram accounts for automated social UGC syncing.
Overview: Review Settings Dashboard
Access review configuration settings at Cartwheel Admin → Reviews & UGC → Settings (/app/reviews/settings).
This workspace controls the operational rules governing your review pipeline:
- Automated Delivery Schedule: When review request emails trigger after order fulfillment.
- Review Submission Incentives: How customers are rewarded for submitting verified photos and videos.
- Facebook & Instagram UGC Connection: Authorizing Meta Developer credentials to import tagged social posts.
1. Automated Delivery Schedule
Fine-tune when review request emails dispatch to ensure customers have received and tested their items:
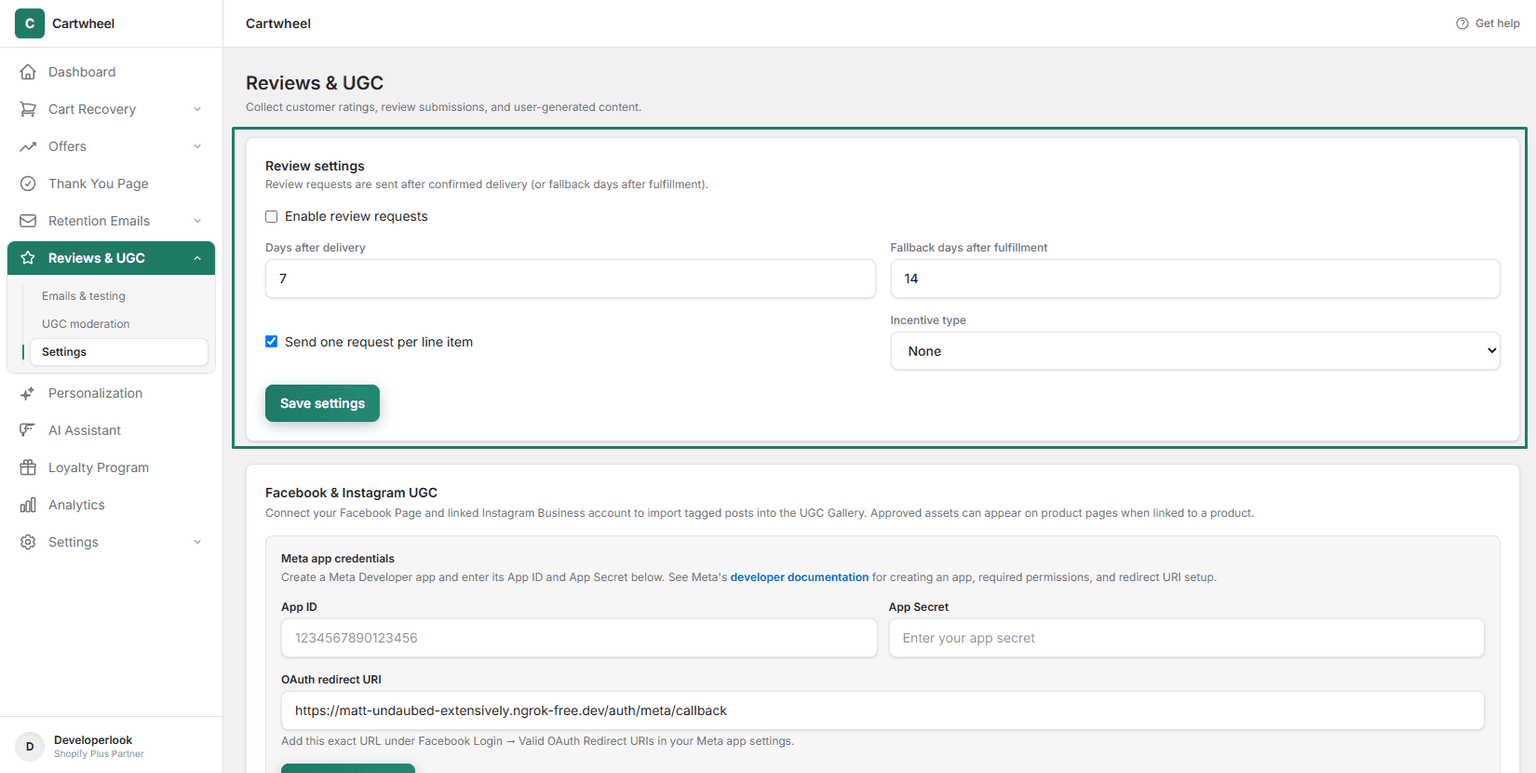
Configuration Options
- Enable review requests:
- Toggle to
ONto allow Cartwheel to automatically queue review collection emails for fulfilled orders. - Toggle to
OFFif you want to pause automated dispatching temporarily.
- Toggle to
- Days after delivery:
- Number of days to wait after carrier tracking marks the order as Delivered before sending the email (default:
7 days). - Recommendation: Set to 3–5 days for fast-consumption goods (beauty, snacks) or 7–14 days for apparel, electronics, or complex products.
- Number of days to wait after carrier tracking marks the order as Delivered before sending the email (default:
- Fallback days after fulfillment:
- Delay used if carrier tracking updates are unavailable or if shipping via standard untracked postage (default:
14 days).
- Delay used if carrier tracking updates are unavailable or if shipping via standard untracked postage (default:
- Send one request per line item:
- When enabled, Cartwheel creates distinct review prompts for each purchased item in multi-item orders, maximizing individual product ratings.
- When disabled, Cartwheel sends a consolidated single email referencing the primary item.
- Click Save settings in the bottom right of the settings card.
2. Review Submission Incentives
Rewarding customers for adding high-quality photos and videos significantly increases visual social proof:
Option A: Single-Use Discount Codes
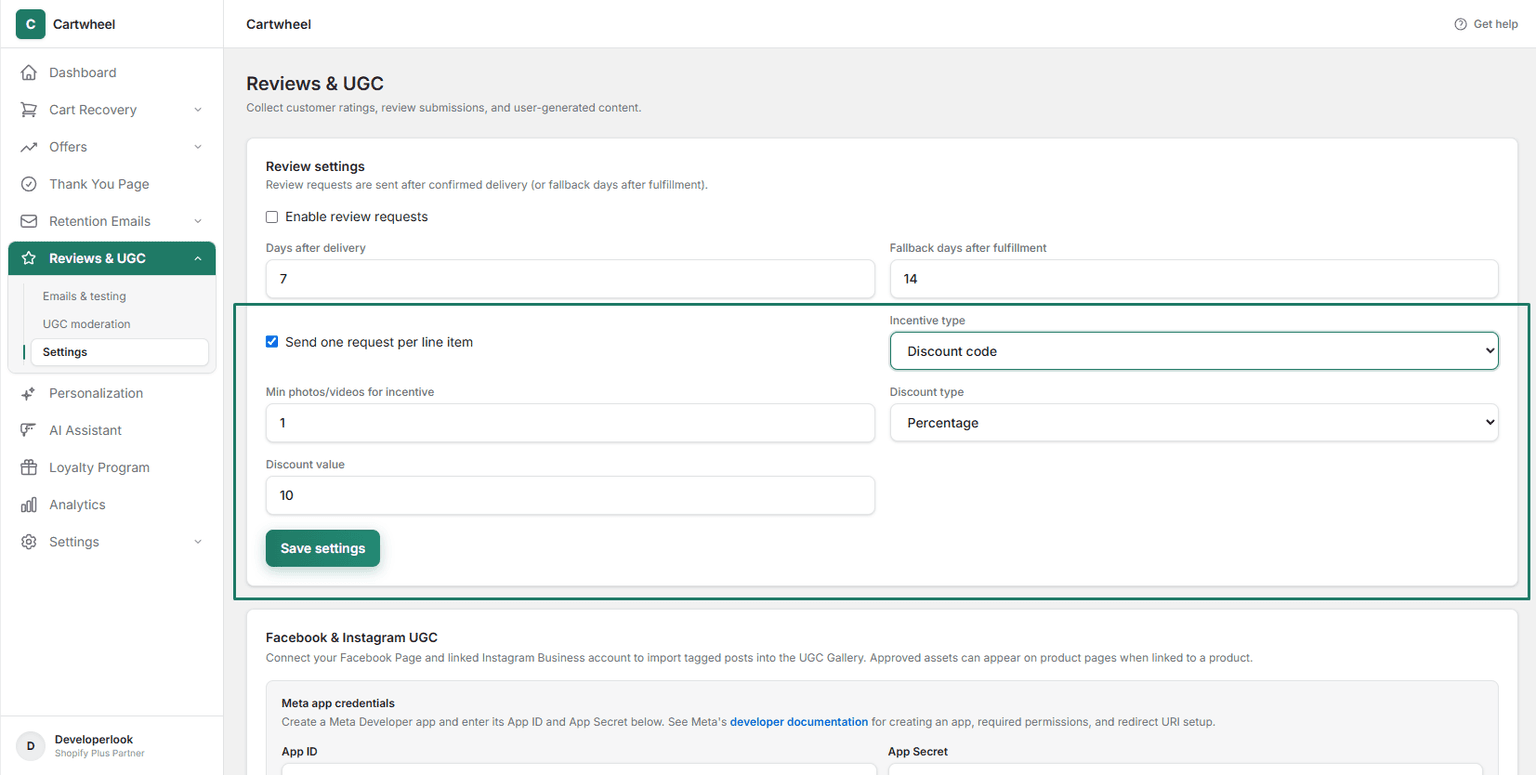
- In the Review Submission Incentives section, set Incentive Type to Discount Code.
- Discount type: Choose Percentage off (e.g.,
15%) or Fixed amount off (e.g.,$10.00). - Discount value: Enter the numerical discount amount (e.g.,
15or10.00). - Min photos/videos for incentive: Set the minimum number of media uploads required to qualify (1–5 items, default
1). - Click Save settings.
Option B: Loyalty Points Bonus
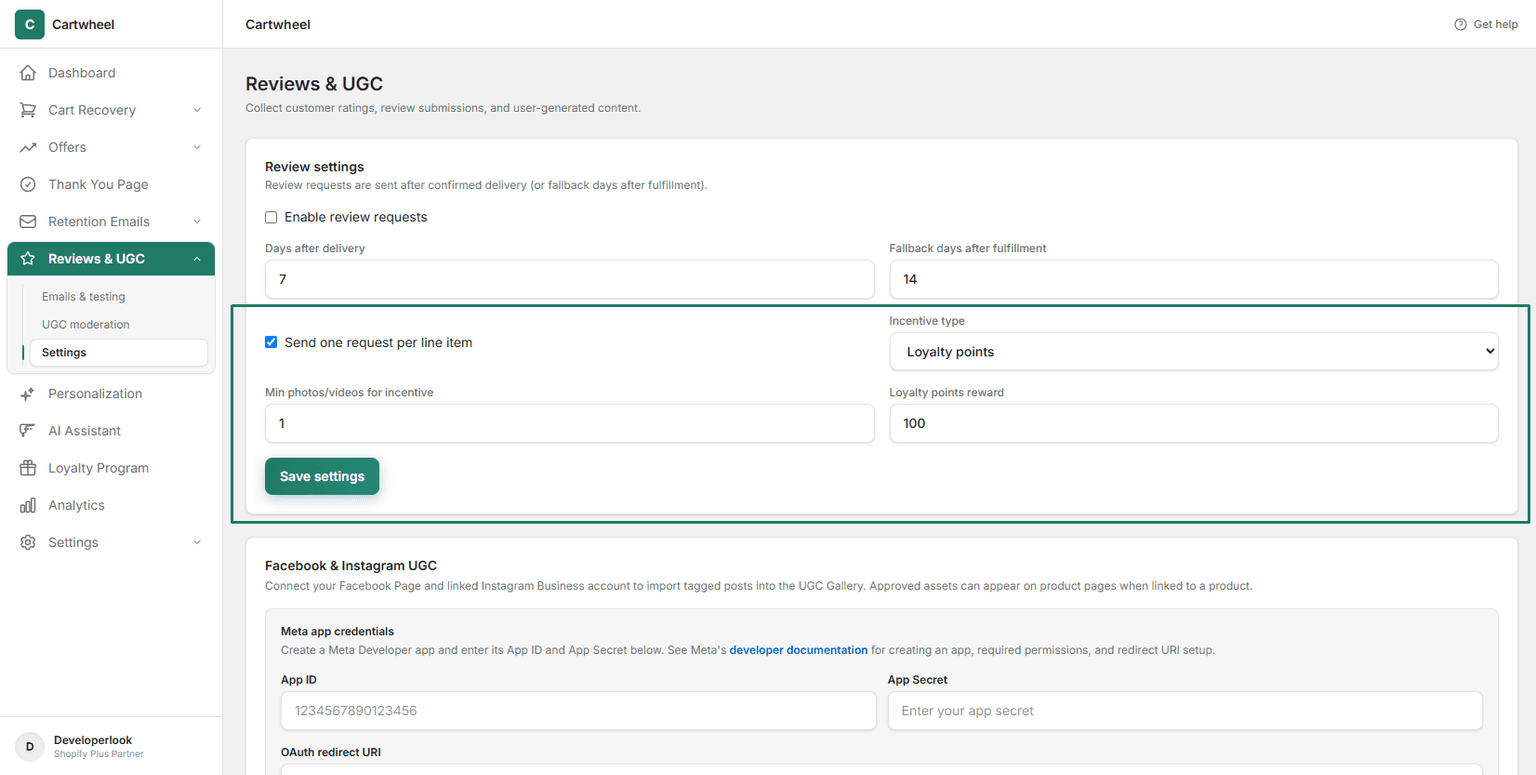
- In the Review Submission Incentives section, set Incentive Type to Loyalty Points.
- Loyalty points reward: Enter the point bonus to award (e.g.,
100points). - Min photos/videos for incentive: Set the minimum required media items (1–5, default
1). - Click Save settings.
3. Facebook & Instagram UGC (Meta Connection)
Connect your brand's Facebook Page and Instagram Business accounts to automatically import customer-tagged photos, reels, and mentions into the UGC Gallery.
Step 1: Create a Meta Developer App
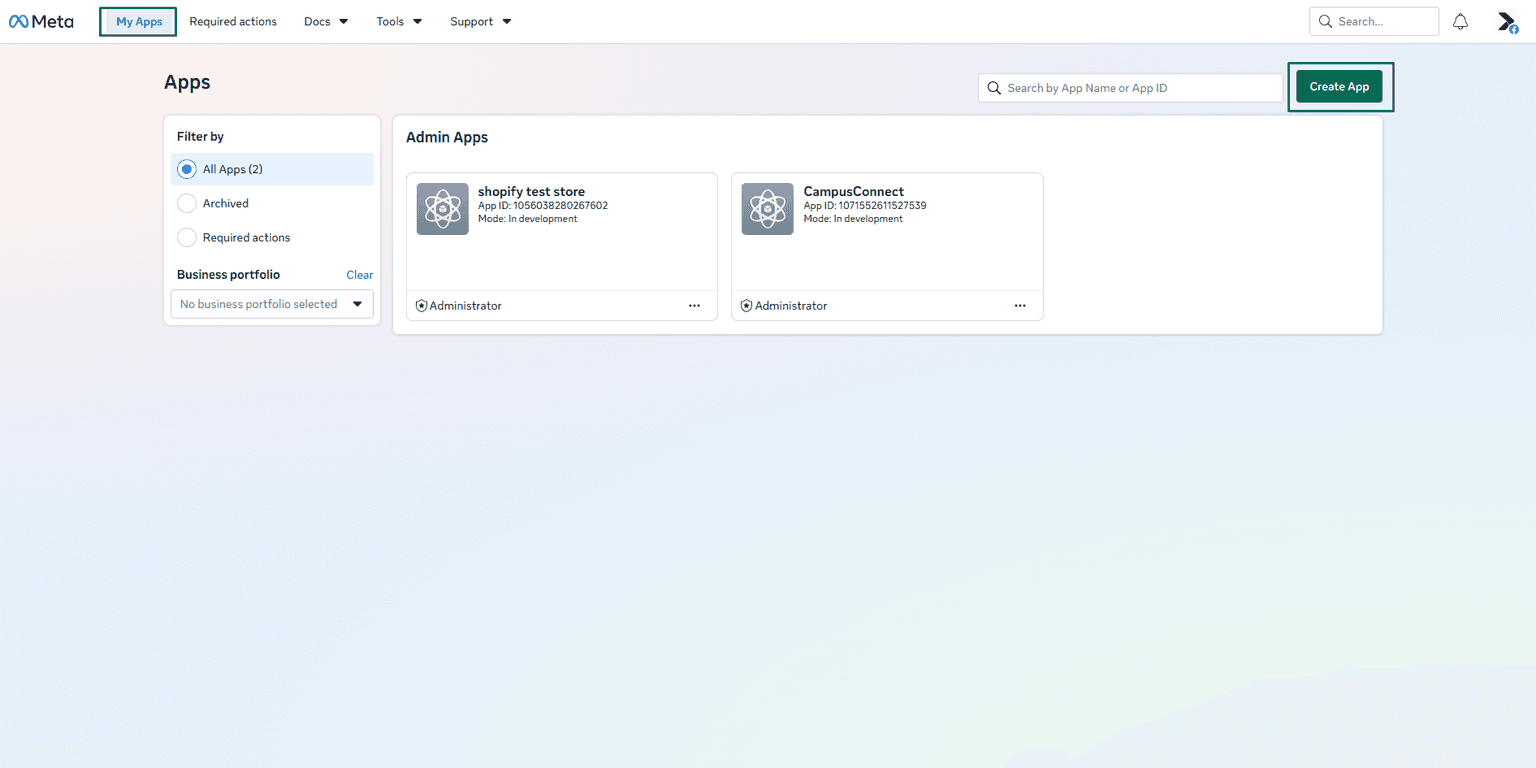
- Log into the Meta for Developers Portal with your administrative Facebook account.
- In the top navigation bar, click My Apps.
- In the top right header of the Apps dashboard, click the green Create App button:
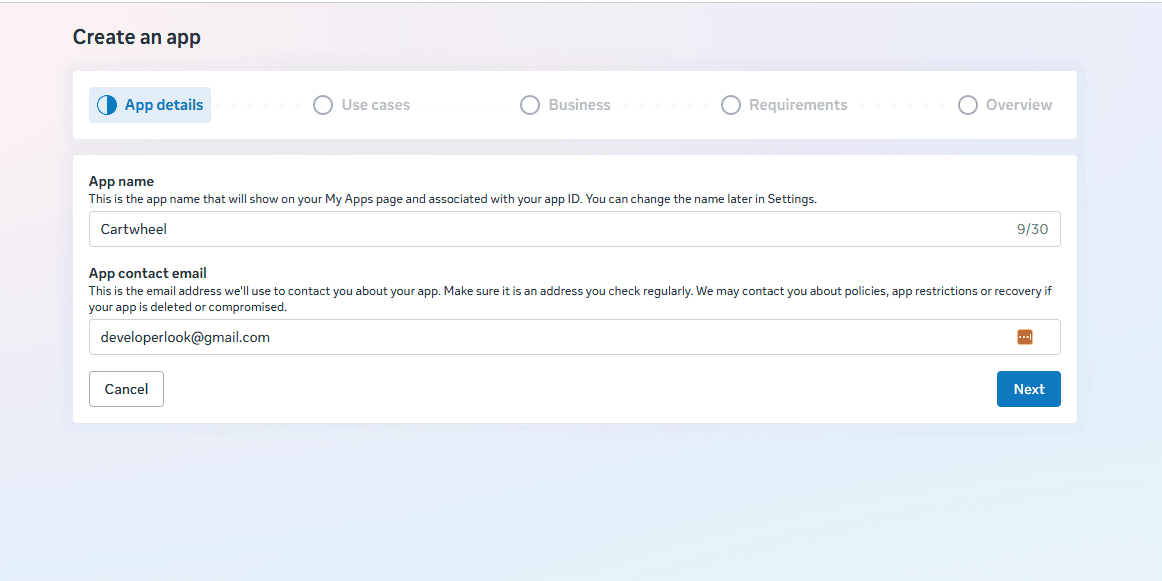
Step 2: Enter App Details
In the Create an app dialog under App details:
- App name: Enter an identifiable name for your integration (e.g.
CartwheelorCartwheel UGC Sync). - App contact email: Enter the email address Meta will use for developer notifications and policy updates.
- Click Next to proceed to the use cases catalog:
Step 3: Select Required Use Cases & Permissions
In the Use cases step during app creation, Meta presents the catalog of available capabilities:
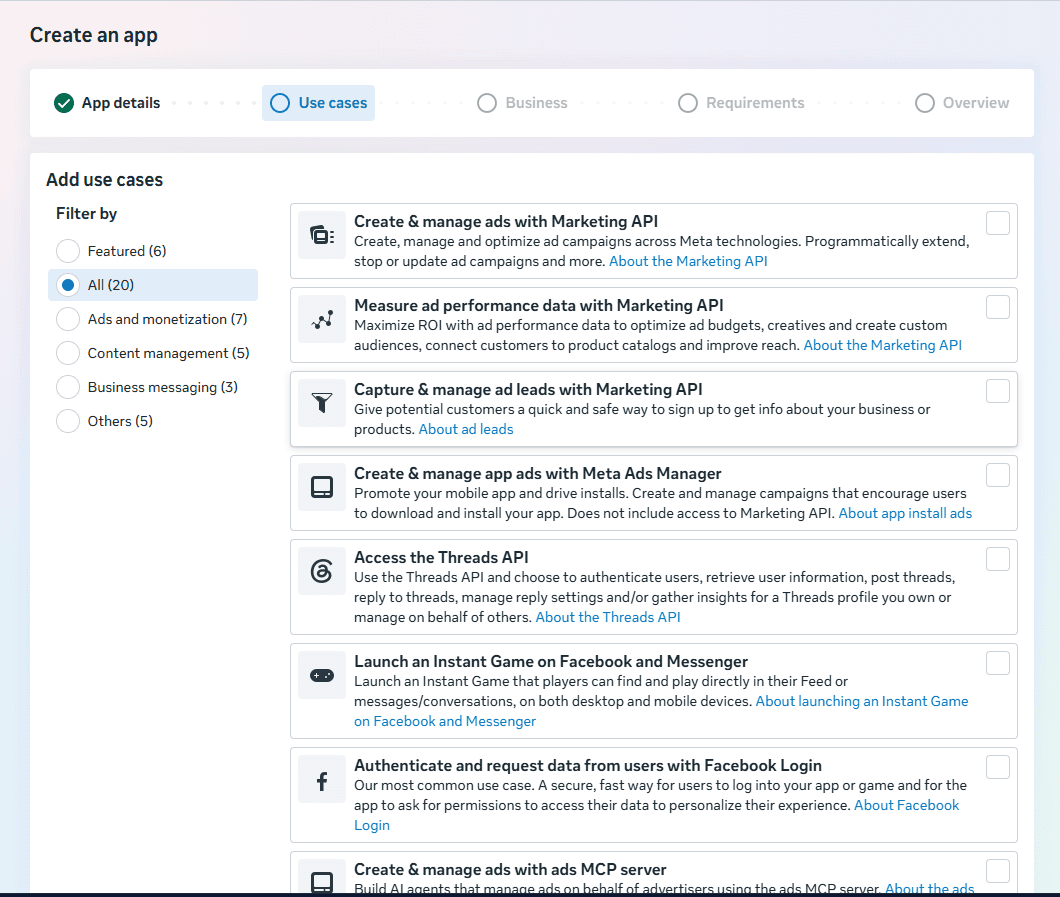
Scroll through the list and select the two required use cases:
- Manage messaging & content on Instagram: Enables Cartwheel to fetch customer photos, reels, and media where your brand handle is tagged.
- Manage everything on your Page: Enables Cartwheel to sync visitor posts, customer reviews, and mentions from your official Facebook Page.
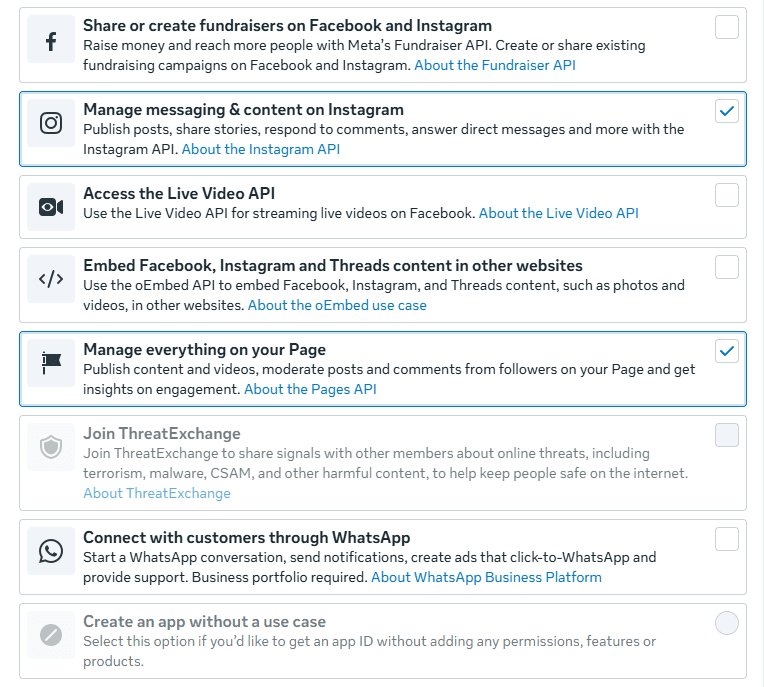
- Click Next, complete the remaining business association steps, and click Create app.
Customizing Use Cases & Adding Required Scopes
After creating the app, navigate to Use cases in the left sidebar to add the individual permissions required for social sync:
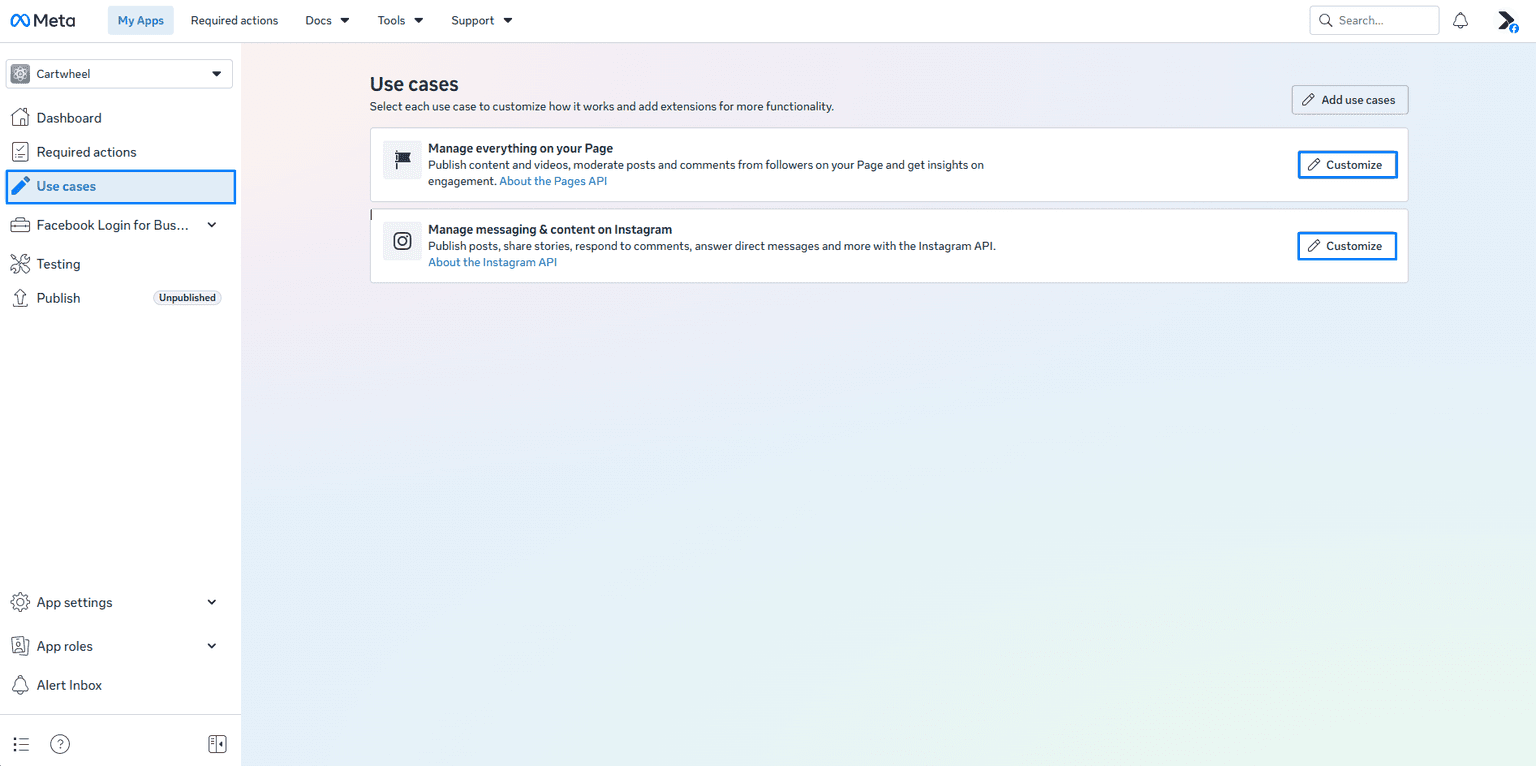
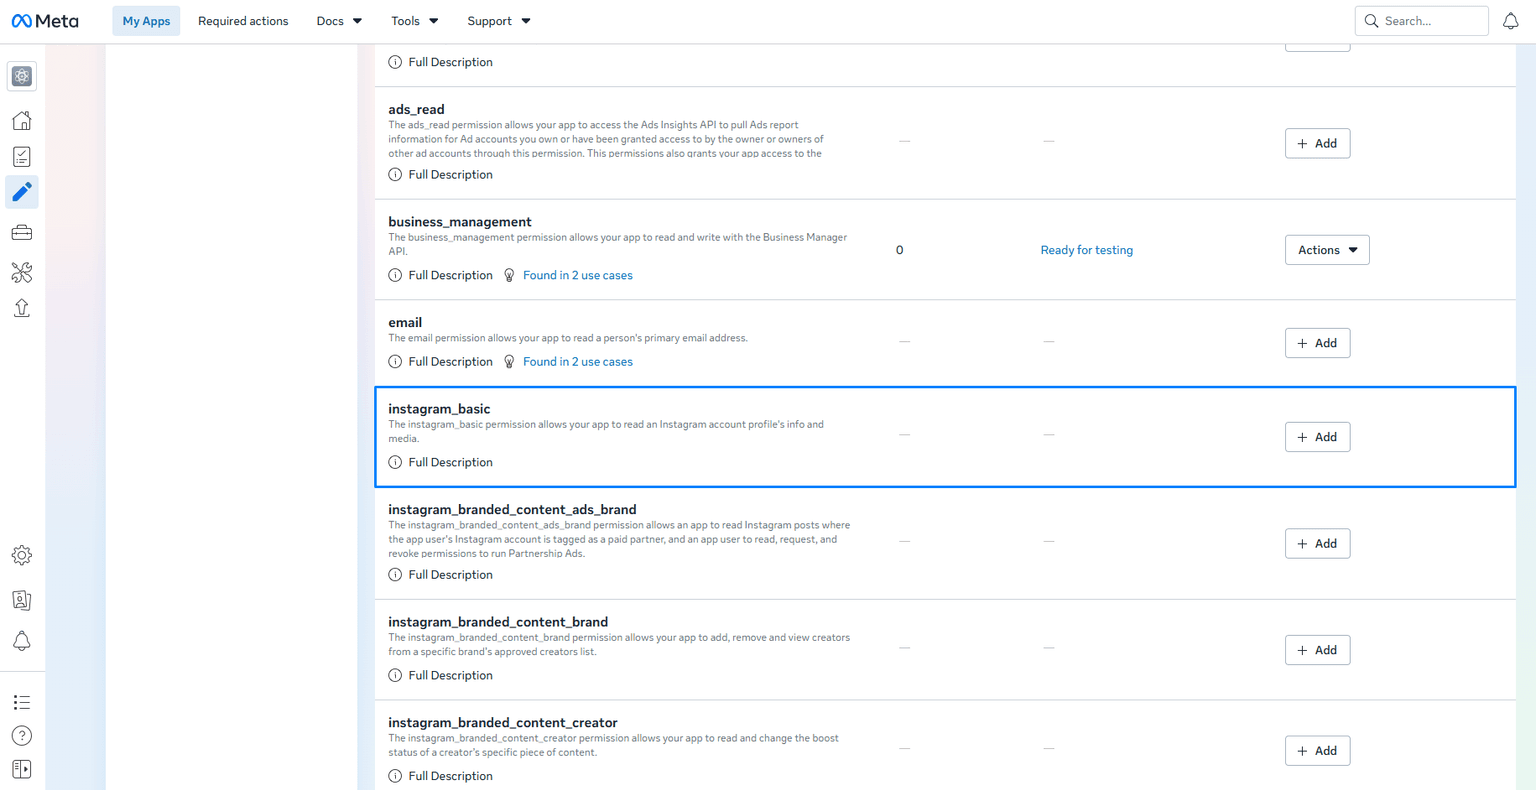
- Instagram Scopes: Next to Manage messaging & content on Instagram, click Customize. Locate
instagram_basicand click + Add:
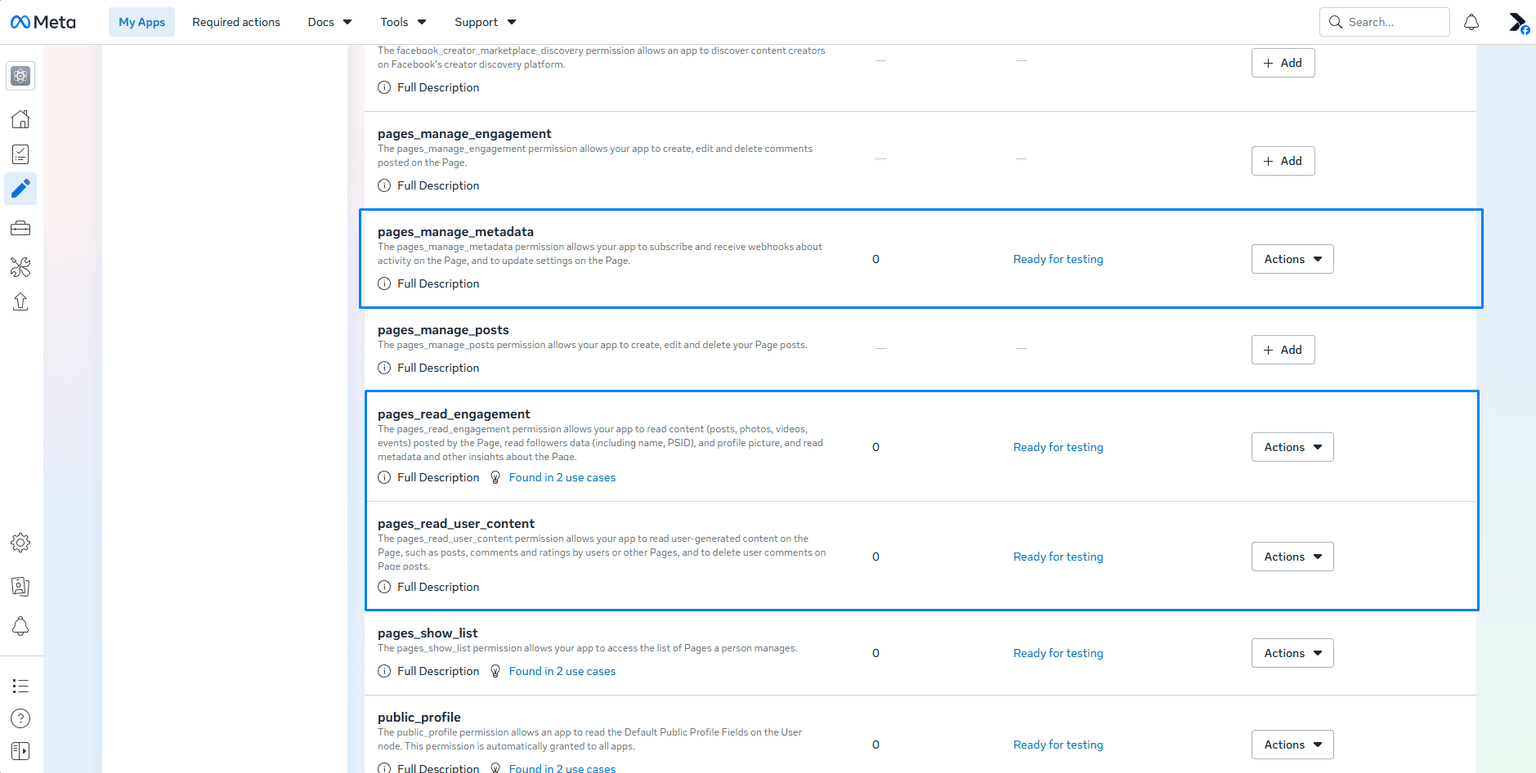
- Facebook Page Scopes: Next to Manage everything on your Page, click Customize. Locate and add:
pages_manage_metadata: Click + Add (or ensure it shows Ready for testing).pages_read_engagement: Click + Add (or ensure it shows Ready for testing).pages_read_user_content: Click + Add (or ensure it shows Ready for testing).
Required Meta OAuth Scopes & Permissions Summary
Cartwheel requests the following 5 granular API permissions to securely sync social UGC without unnecessary access:
| Permission / Scope | Use Case & Purpose |
|---|---|
pages_show_list | Lists your managed Facebook Pages so you can select the store's primary page. |
pages_read_engagement | Reads post metadata, comments, and engagement on your Facebook Page. |
pages_read_user_content | Reads customer-submitted photos, videos, and tagged content on your Facebook Page. |
pages_manage_metadata | Subscribes to real-time Page webhooks for instant social sync triggers. |
instagram_basic | Reads media, photo URLs, captions, and reels where your Instagram handle is tagged. |
Step 4: Configure Facebook Login & OAuth Redirect URI
- In Cartwheel Admin (Reviews & UGC → Settings), scroll to the Facebook & Instagram UGC section and locate the OAuth redirect URI field:
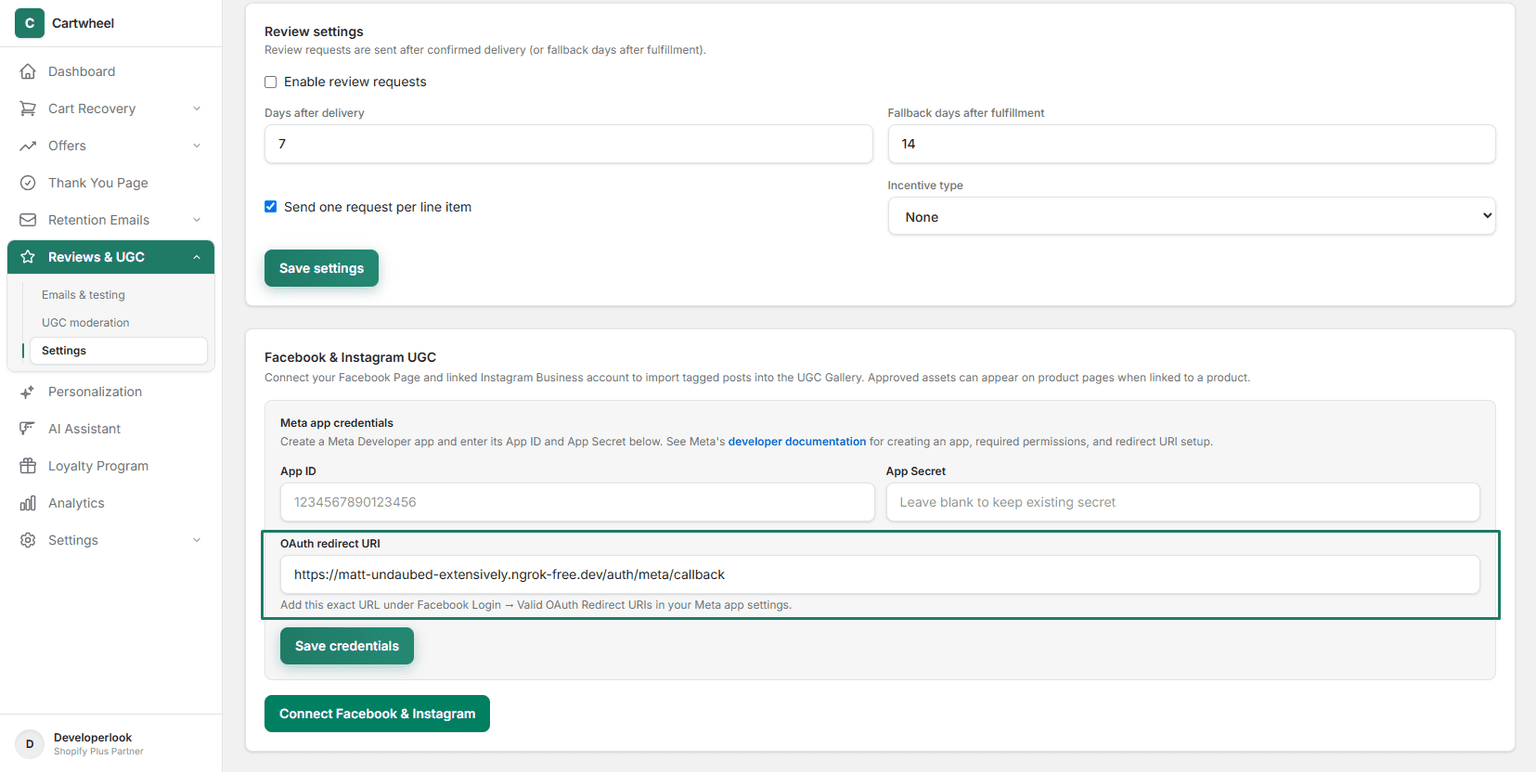
- Copy the full redirect URL string.
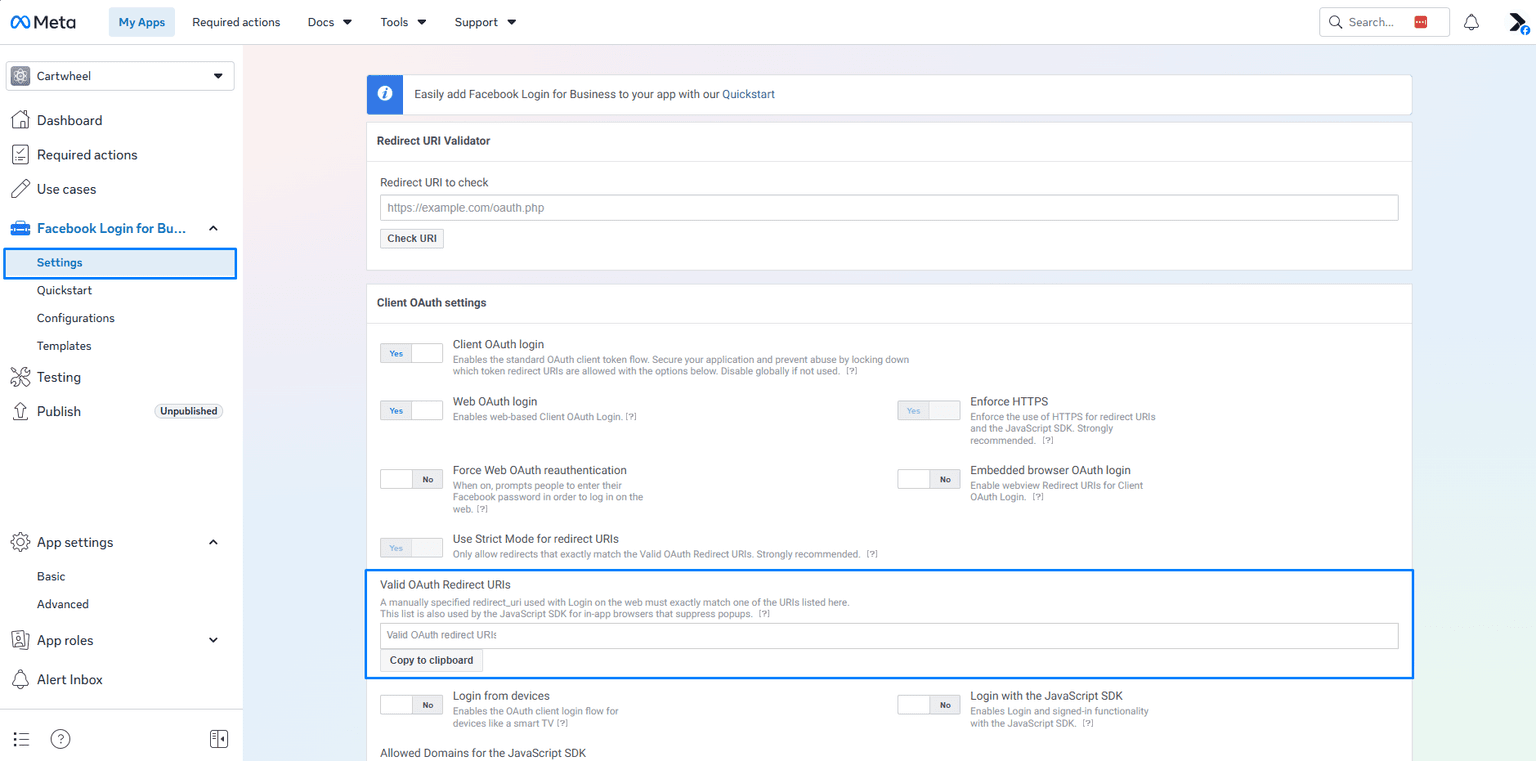
- In your Meta Developer dashboard left sidebar under Facebook Login for Business, click Settings.
- Under Client OAuth settings, locate the Valid OAuth Redirect URIs input field and paste the copied URL:
- Click Save changes at the bottom of the Meta Developer page.
Step 5: Connect Credentials in Cartwheel Admin
- In the Meta Developer portal left sidebar under App settings, click Basic:
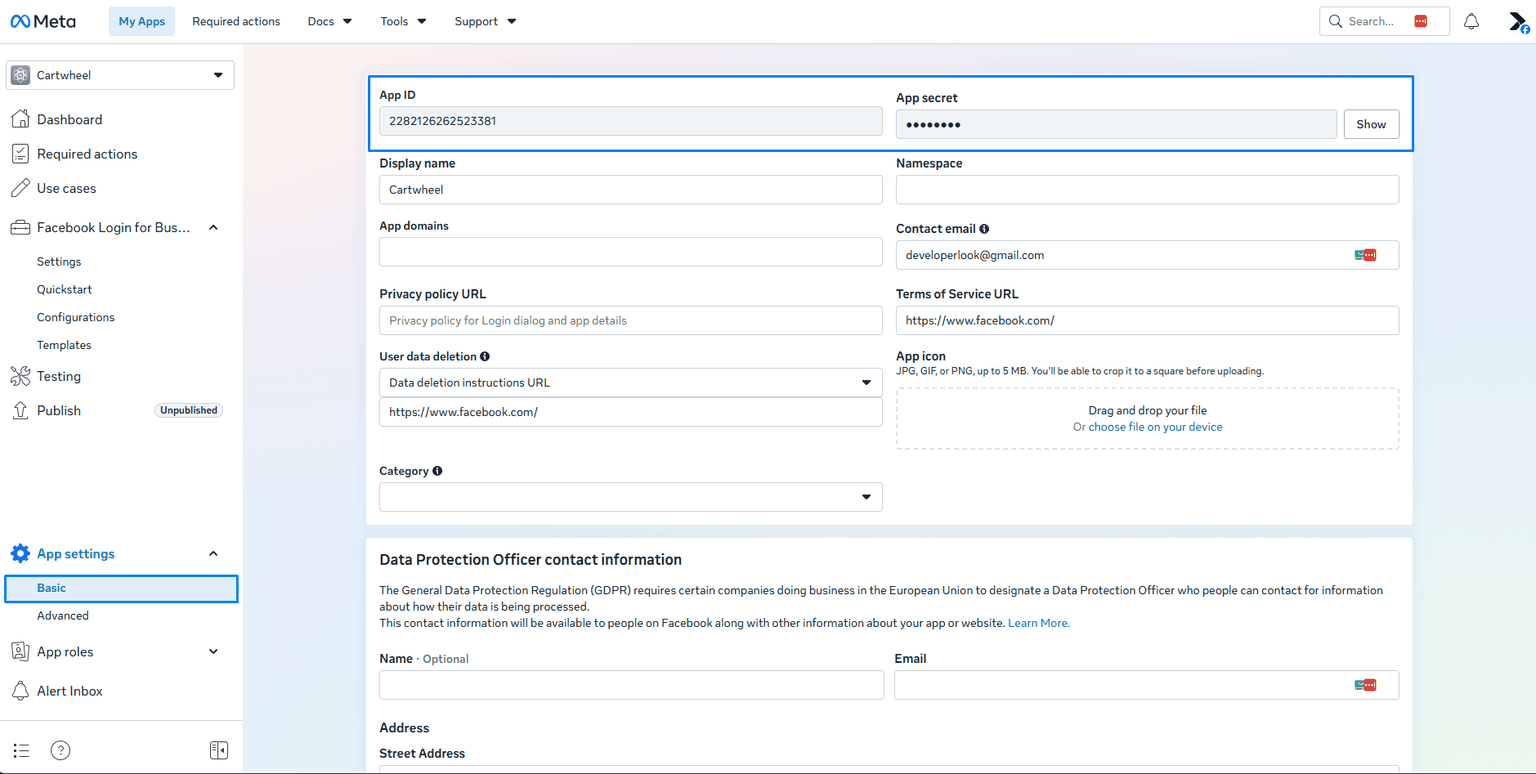
- Copy your numerical App ID. Next to App secret, click Show (enter your Facebook password if prompted) and copy your App secret string.
- In Cartwheel Admin under Meta (Facebook & Instagram) Connection:
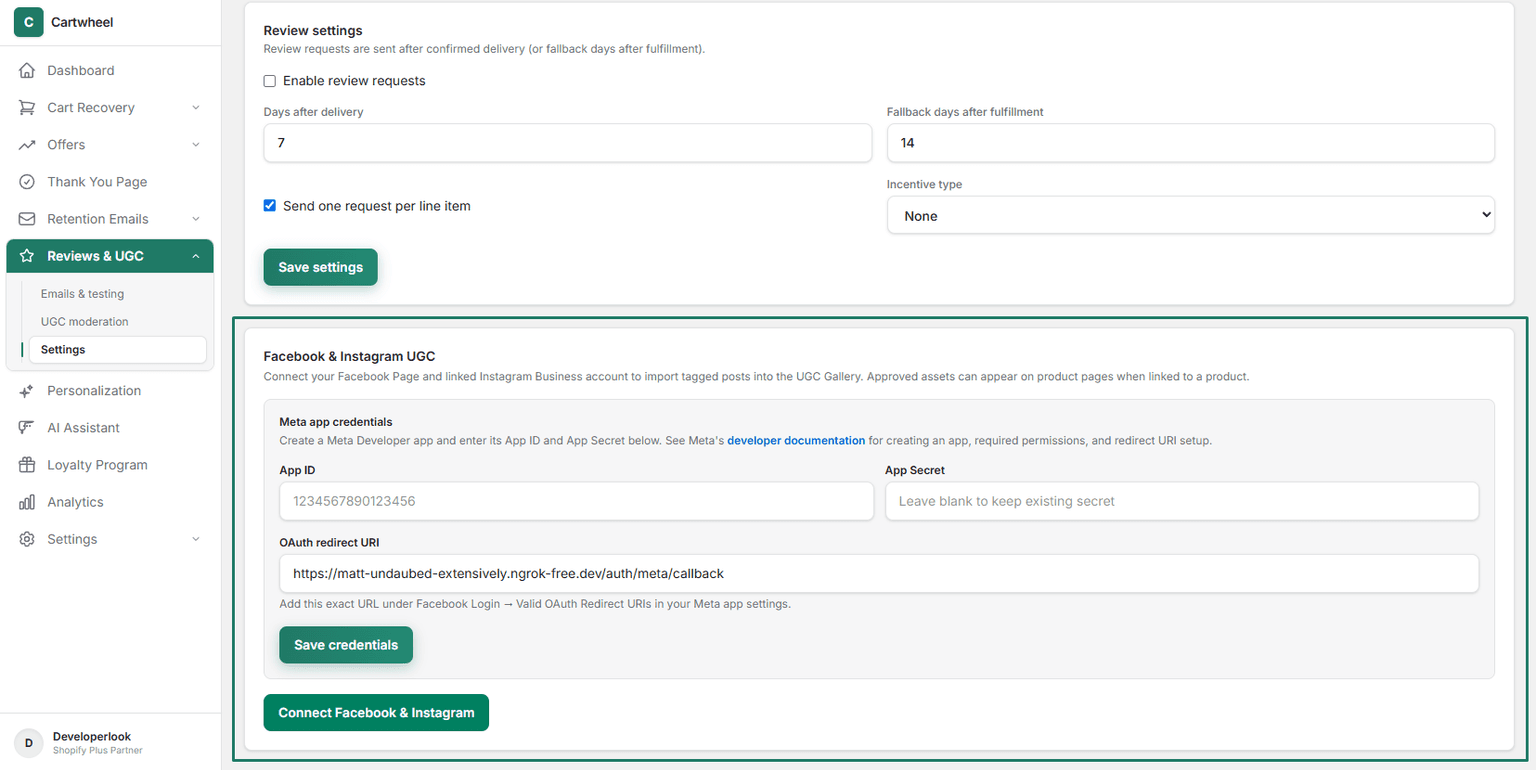
- Paste your Meta App ID.
- Paste your Meta App Secret.
- Click Save credentials.
- Click Connect Facebook & Instagram. A secure Meta authorization window opens.
- Select your target Facebook Page and linked Instagram Business account, and grant access permissions.
Step 6: Manage Connected Accounts, Sync & Disconnect
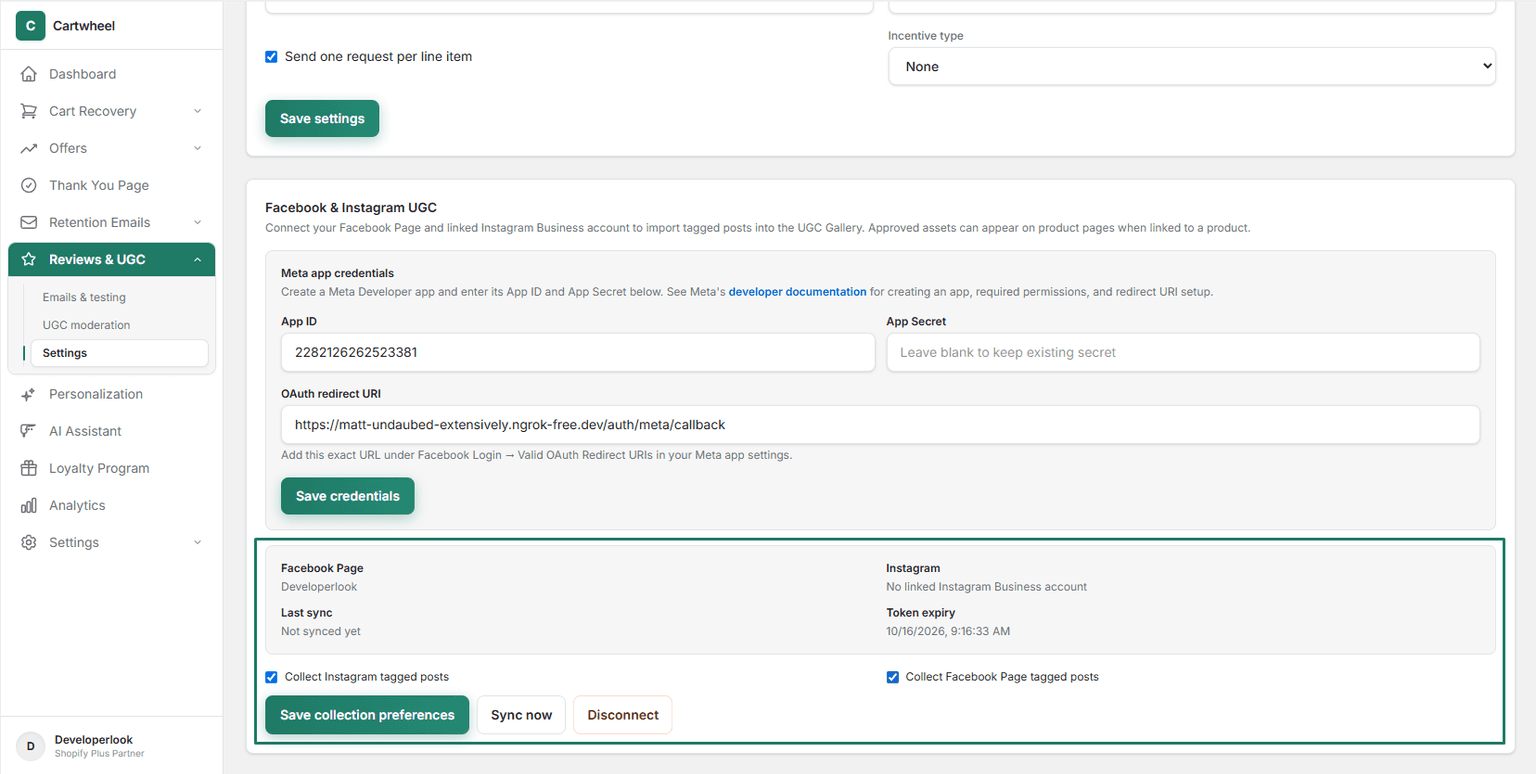
Once authorization is complete, Cartwheel displays your active connection details and sync controls:
Connection Details & Metadata
- Facebook Page: Confirms the connected Facebook Page name (e.g.
Developerlook). - Instagram: Displays your linked Instagram Business profile username, or confirms if no Instagram Business account is currently attached to the selected Facebook Page.
- Last sync: Shows the exact date and timestamp of the most recent sync execution (or
Not synced yeton initial setup). - Token expiry: Displays the expiry date of the long-lived Meta Page access token. Cartwheel automatically renews active tokens in the background to ensure uninterrupted sync.
Configuring Automated Collection Preferences
Use the collection toggles to control which social channels Cartwheel monitors:
- Collect Instagram tagged posts: Enable to automatically import customer reels, photos, and carousel posts where your brand's Instagram handle is tagged.
- Collect Facebook Page tagged posts: Enable to automatically import customer recommendations, visitor posts, and mentions from your official Facebook Page.
- Click Save collection preferences to apply your changes.
Running On-Demand Manual Sync (Sync now)
Click Sync now at any time to immediately pull the latest tagged posts from Meta:
- Cartwheel queries Meta's Graph API for recent tagged media, high-resolution image/video assets, captions, and creator handles.
- Newly synced posts are automatically routed to the UGC Moderation Queue in an
UNMODERATEDstate. - Once approved and tagged with products in the moderation workspace, they will render live in your storefront UGC Gallery theme blocks.
Disconnecting Your Meta Account (Disconnect)
If you ever need to switch Facebook Pages, update permissions, or revoke Cartwheel's social access:
- In the Facebook & Instagram UGC card, click the Disconnect button.
- Cartwheel immediately purges the stored access tokens and unregisters active social webhooks.
- To reconnect with new or updated credentials, verify your App ID and App Secret, click Save credentials, and click Connect Facebook & Instagram.
Related Guides
- Storefront Setup & Overview — embedding reviews and UGC widgets in Shopify themes
- Review Requests & Email Delivery — managing request queues and email templates
- UGC Gallery & Moderation — approving customer media and tagged social assets
- Loyalty Program & Tiers — managing point balances and customer reward tiers
- Settings & Integrations — managing app-wide settings and API connections